Resetting a router can feel like navigating uncharted territory, but it’s often the simplest solution to network issues or forgotten passwords. For Netgear Nighthawk users, understanding how to perform a factory reset is essential for restoring default settings and ensuring smooth connectivity.
To reset your Nighthawk router to factory settings, press and hold the Reset button on the back of the device for about 30 seconds using a paperclip or similar tool. Release it once the power light blinks, signaling that the process is complete.
A factory reset wipes all personalized configurations—WiFi names, passwords, and security settings—but also paves the way for a fresh start when troubleshooting becomes necessary. Ready to take control of your setup? Let’s break down every step with ease.
1. Locate Reset Button
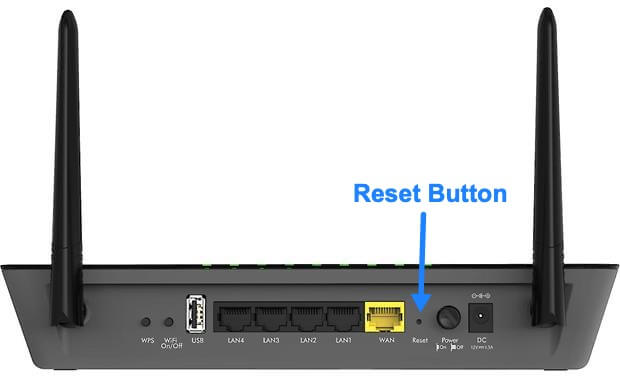
Finding the reset button on a Nighthawk router can feel like searching for hidden treasure—but without any rewards afterward. Typically, it’s located at the back of the device, nestled among ports and labels, sometimes in plain sight but often overlooked.
The button is small—ridiculously small. It’s usually recessed to prevent accidental presses (because who doesn’t love accidentally resetting their whole network during binge-watching?). You’ll need a pointed object—like a paperclip or pin—to press it effectively. Don’t bother poking around with your fingers; they’re just not precise enough here.
Look closely near key connection points like Ethernet ports or power inputs. On some models, you’ll spot words like “Reset” printed above or below the hole. Pro tip: if you’ve been staring too long and still don’t see it, grab a flashlight—it works wonders! Familiarizing yourself with this tiny yet crucial feature is step one before diving into the reset process further.
2. Perform Reset
Resetting the Netgear Nighthawk router isn’t complicated if you know what you’re doing, but missing a step can lead to frustration. First, they must ensure the router is powered on and lights are stable—no one likes pressing buttons only to realize the device isn’t even turned on.
Next comes the slightly tricky part: locating that tiny reset button (likely recessed) and pressing it with a paperclip or safety pin. For resetting properly, hold it down for at least 10 seconds until the LEDs start blinking in protest. If nothing happens after this step, don’t assume it’s broken—keep holding just a couple more beats before letting go.
Once set loose, the router will automatically restart itself—the reboot may take several minutes, so patience here is key. During that time, all its precious custom settings vanish into oblivion as factory defaults emerge victorious! Time to plan those WiFi credentials again because your network’s starting fresh like day one.
3. Complete Setup
After resetting the Netgear Nighthawk router, it’s time to set it up from scratch—because what’s a factory reset worth if you don’t get back online? Start by connecting your computer or mobile device to the router using an Ethernet cable or WiFi network. Look for the default SSID and password printed on the router’s label—it’s usually something like “NETGEARXX”.
Next, open any browser and type 192.168.1.1 (or sometimes routerlogin.net) in the address bar. If nothing happens, double-check that you’re connected correctly; even tech-smart devices have their moody days.
Once logged into the setup interface with admin credentials (again listed on the router), you’ll be prompted to configure basic settings like your new WiFi name and password. Pick something secure but easy enough not to send everyone scrambling—a good mix of letters, numbers, and special characters works best.